Welcome to the third video of the Rhythm Guitar Quick-Start Series! In this lesson, I’ll teach you how to move the power chord shapes from the last lesson all around the fretboard to play any power chord you want. If a band mate, friend you’re playing with, or even sheet music tells you a specific power chord to play, you’ll be confident that you have a way to get right to that power chord.
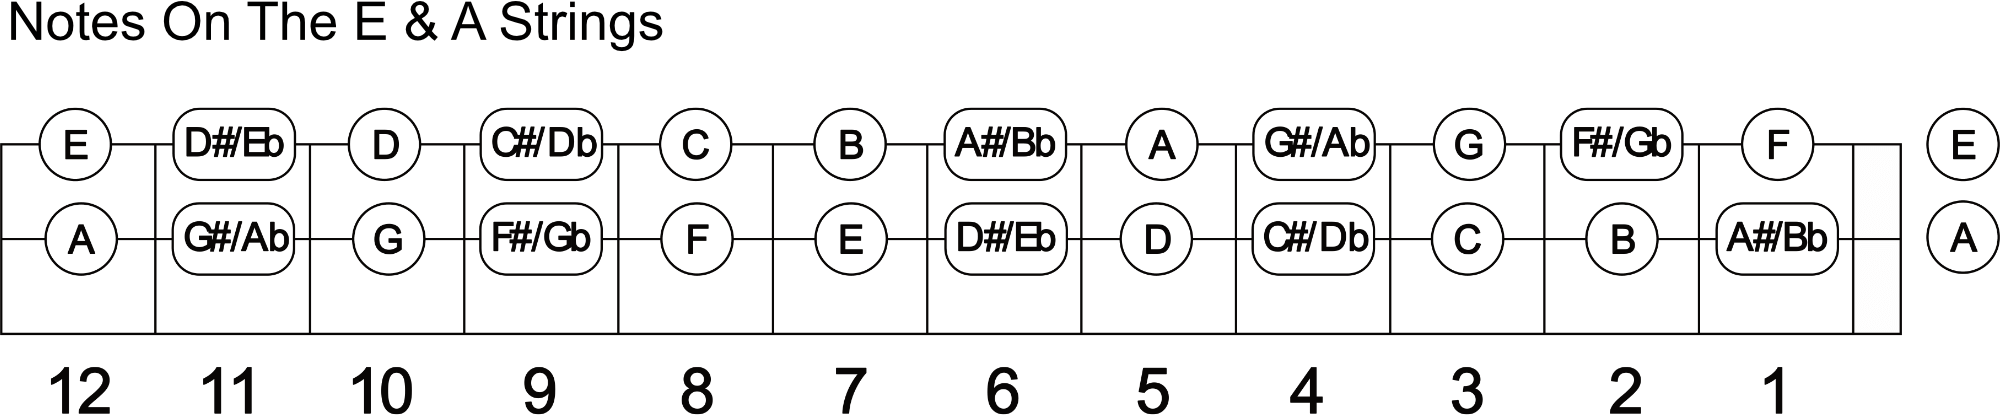
First off, to be able to move your power chords efficiently, you’ll need to know the note names on the sixth and fifth strings. Let’s start with the low E string. On screen, you’ll see a graphic with the names of the notes for the first twelve frets. Those will be the root notes for your power chords. Eventually, you’ll need to memorize the notes on the sixth string, but for now you can refer to this graphic.
If you look at the notes on the first twelve frets, you can probably see that it just uses the first seven letters of the alphabet. Beginning with the open E string, these are the natural notes, and then we see sharp and flat notes in between. Don’t worry about the sharp and flat notes right now. I just want you to notice that the notes are coming from the first seven letters of the alphabet, something you’re already familiar with.
It may take some time for you to memorize, and that’s okay, because you’re already working on things that will help you memorize it. By working on your power chords through this lesson and as a part of your daily practice, you’ll start to memorize all the notes on the low E string.
What we’re going to do next is play the two-note version of the G power chord we learned in the last lesson. Remember that the note you’re playing with your index finger is the root note of the power chord, so with your index finger on the third fret here, we’ve got a G note and a G power chord.
The cool thing about power chord is that they are movable to anywhere along the fretboard, as long as your index finger is on the sixth or fifth string. The name of the power chord will simply change based on the where your index finger is. So if I move my power chord a couple of frets so that my index finger is on the first fret, this would be an F power chord, which you see labeled on the graphic on-screen.
Let’s try moving the power chord again. Put your index finger on the fifth fret of the low E string and finish your power chord shape. Based on the graphic on-screen, you can see that we’re now playing an A power chord. This may seem simple to you so far, and if it does, that’s awesome. You’ll be able to play tons of power chords just by moving the shapes around.
If this seems a little harder for you, the challenging part of this is memorizing the root notes on the low E string. Try starting out with the natural notes first, because those will come easier to you. As you practice more, then you’ll start to learn where the sharp and flat notes are too.
I mentioned earlier that you can play your power chords on your sixth string or fifth string. We’ve got a new graphic on screen at this point to show the note names on the A string, and you’ll see the note progression is the same as the low E string. The only difference is that it starts with an A note instead of an E.
Let’s try playing a power chord on the A string. Place your index finger on the fifth fret of the fifth string, and then your third finger on the seventh fret of the third string. Looking at the graphic, since your index is finger is on the fifth fret, you’re playing a D power chord.
Just like power chords on the sixth string, you can move this power chord up and down the fretboard to anywhere you like. If you move your power chord shape to have your index finger on the third fret of the fifth string, you’re now playing a C power chord.
After all this, you might be wondering why we would learn to play power chords on both the sixth and fifth string. Let’s look at a quick example of the value of using both strings. If I wanted to play a common G-C-D power chord progression and I only used the sixth string, you can see in the video that my hand has to move pretty far up the fretboard from the third fret, to the eighth, and then to the tenth. So it is possible, but it’s a lot of shifting around to worry about.
Using both the sixth and fifth string for chord progressions like this is more efficient because you won’t have to jump around so much. If I start on my G power chord again at the third fret, I can move to the C using the fifth string at the third fret still, and then finish with my D power chord on the fifth fret of the fifth string.
From watching the video and trying it out yourself, you can see how much more efficient it is to use both the low E and A strings to play power chords. As you work through them, be sure to work on playing the power chords cleanly.
To help you practice your power chords, I’ve made a simple jam track that goes through the G-C-D progression. The track will stay on G for one measure, C for one measure, and then D for one measure. You can play either whole or quarter notes for your strumming. As you practice, you can try staying on the sixth string, staying on the fifth, and then playing your power chords on both.
Thanks for watching this lesson. There’s a lot of information here, so feel free to come back and review it anytime. Being confident in using and moving around power chords is an extremely important skill to have as a rhythm guitarist.
In the video four, we’re going to cover bar chords, a topic that newer guitarists often fear. Don’t worry though, because I’ll be giving you some good tips on making your bar finger strong and keeping your chords sounding clean.
Next Lesson - How To Play Bar Chords
Enter your email address below to get Ayla’s free 6 lesson plan and start playing songs on the acoustic guitar in no time!