Welcome to the eighth video of the Rhythm Guitar Quick-Start Series! So far in this series, we’ve gone over power chords, bar chords, and how to move them all around the fretboard, but no rhythm guitar series would be complete without some open chords. In this lesson, I’m going to teach you the most essential chords you need to know as a rhythm guitar player.
Bar chords and open chords often go by the same name, yet they sound very different. In the video, the G bar chord and the open G chord each have a distinct sound. Not only do they sound different, but they can also be played in different spots on the fretboard. Depending on what you’re playing, you may want to use a bar chord some times and an open chord at other times. It’s important for you to know both types of chords so you have more options and more freedom when playing guitar.
The opens chords we’re going to play during this lesson are G major, C major, D major, E major, E minor, A major, A minor, B, and F. You already kind of know the F and B chords because I’ll be teaching you the bar chord shapes. It’s important to include those chords since they’re in the same area of the fretboard as your open chords. If you’re already comfortable with these chords, that’s fine, but you should still watch the entire lesson because I’ll be giving you some tips on playing clean sounding chords and having smooth transitions.
This will be a lot of information, so don’t feel like you need to have all these chords down before you move on to other things. Instead, take one or two at a time, work on them, and then bring them into your daily practice routine. Once we go through all these open chord shapes, we’ll apply them to a few popular chord progressions that we went over in the previous lesson.
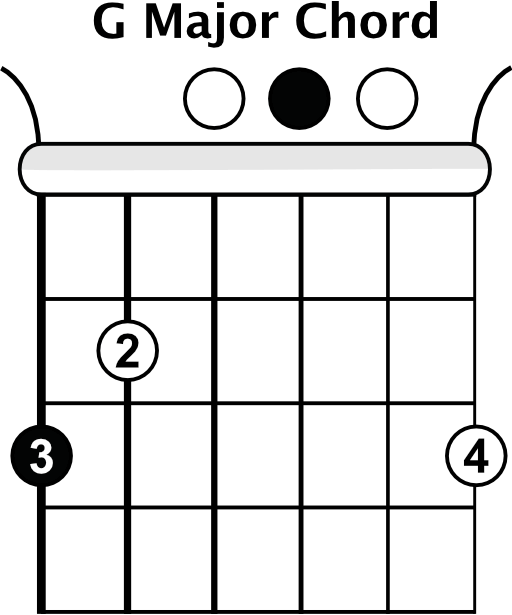
The first chord we’ll learn is an open G chord, and I’ll show you two different fingerings. The first one uses your first, second, and third fingers and the other uses your second, third, and fourth fingers.
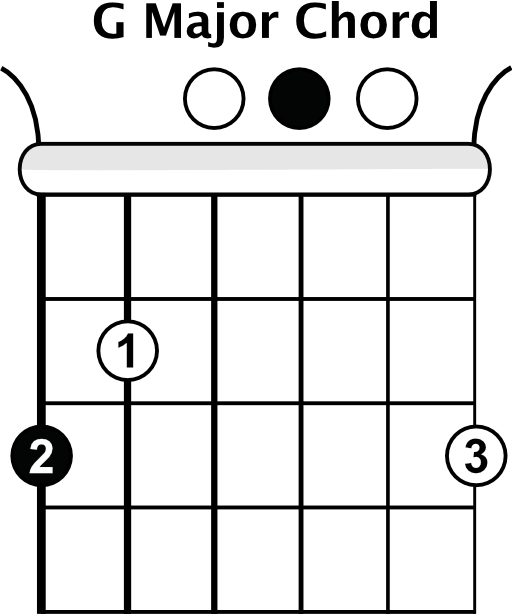
Going through the first one, you’ll put your second finger on the third fret of the low E string, your first finger on the second fret of the A string, and then your third finger on the third fret of the high E string. This is an open G major shape and you can strum all six strings of this chord.
The second fingering you can try is playing the same notes with your second, third, and fourth fingers. Using this fingering for the G major chord makes it is easier to change to an open C chord, which is a very common change.
The second open chord shape we will learn is a C major chord. Put your first finger on the first fret of the B string, second finger on the second fret of the D string, and your third finger on the third fret of the A string. When you play a C major, don’t worry about strumming the low E string, as it should be left out.
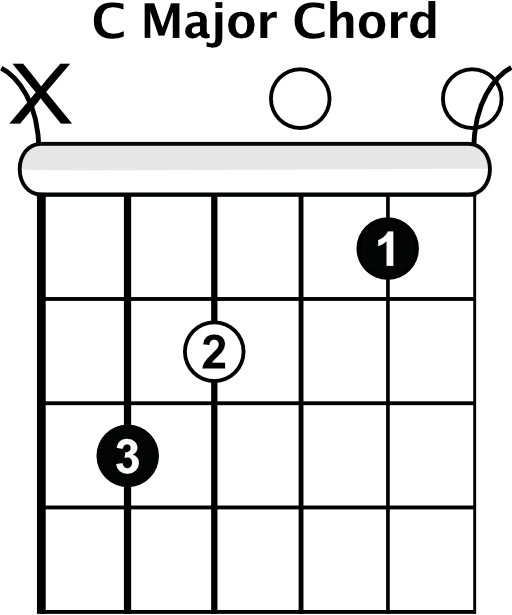
Lots of new guitar players can have trouble with this chord shape because they can’t quite reach the third fret of the A string with their third finger. If that’s the case for you, make sure you have good posture with your hand. If you bring your elbow down closer to your body, it puts your hand in a better position to grab that note.
The next chord we’ll learn is open D major. Put your first finger on the second fret of the G string, your second finger on the second fret of the high E string, and your third finger on the third fret of the B string. When you strum the D major chord, just strum the top four strings, leaving the low E and A strings out.
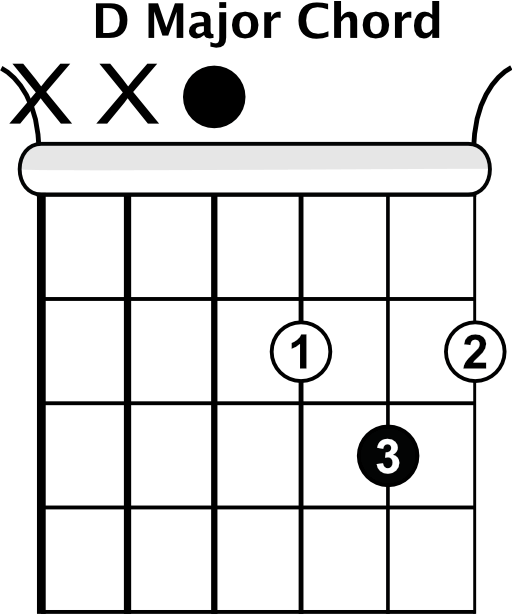
One problem that newer guitar players can have with this chord is that their fingers are sitting so close together in a small space that they end up muting the strings around them. You’ll notice that your third finger can easily mute the high E string if you’re not aware of it. In order to avoid this problem, make you’re playing on the very tips of your fingers.
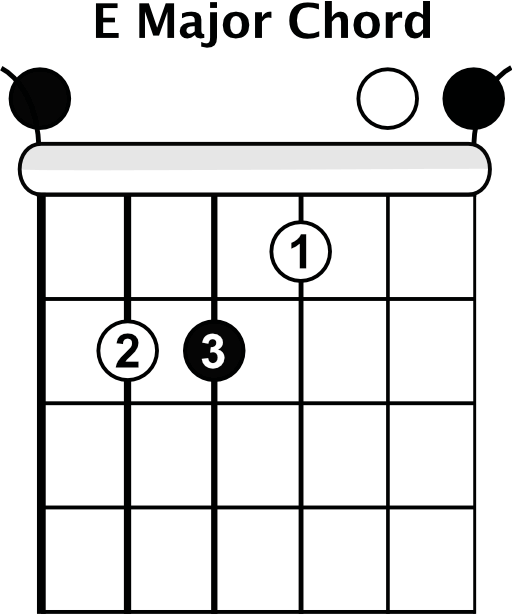
The next chord shape we’ll learn is the open E major chord. If you’ve already learned bar chords from earlier in this video series, then you already know the shape. Put your first finger on the first fret of the G string, your third finger on the second fret of the D string, and your second finger on the second fret of the A string. You can strum all six strings for the E major chord. This is another chord where your fingers might be too close together and accidentally mute other strings, so make sure you’re playing on the tips of your fingers.
One tip I want to give to help switch between chords smoothly is to make sure that you know the chord shapes you’re using really well so you can go right to them. Be comfortable with making each shape before even trying to switch between chords.
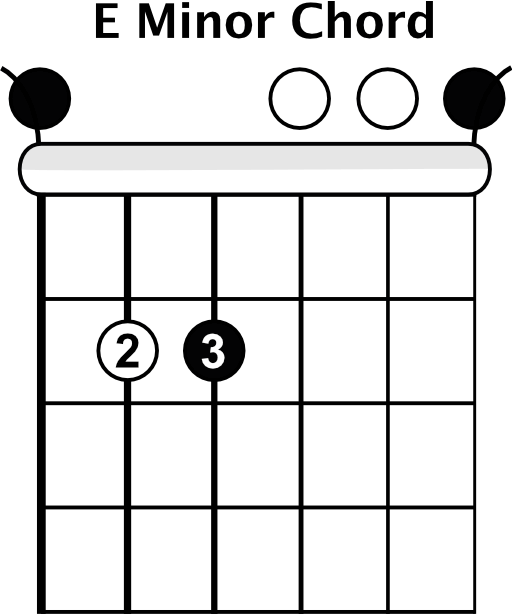
The next chord we’ll look at is the open E minor chord, which is really easy once you know E major chord. If you make an E major chord shape, all you have to make an E minor chord is take your first finger off of the G string. An easy way to practice your E minor chord is to work on switching between the E major and E minor chords.
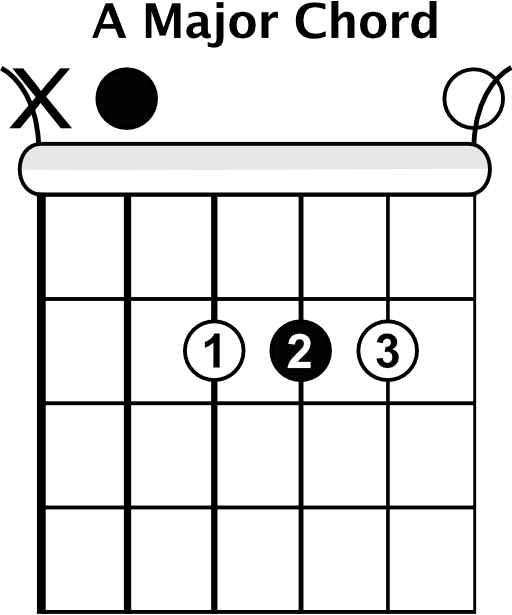
The next chord to learn is A major, and if you’ve learned your bar chords, you’ll know this chord already. Put your first finger on the second fret of the D string, your second finger on the second fret of the G string, and your third finger also on the second fret of the B string. You have to really scrunch your fingers together to get them all in the second fret, and when playing this chord, you leave the low E string out.
Another tip I want to give you for smoother transitions between chords is to anticipate the next chord. It helps to visualize and feel your next chord before you actually need to change to it. If I’m switching between an E major and an A major, and I know I have about two bars before I need to switch to A major, I should be thinking about what that chord looks and feels like. This tip prevents you from being surprised by the next chord and accidentally missing it.
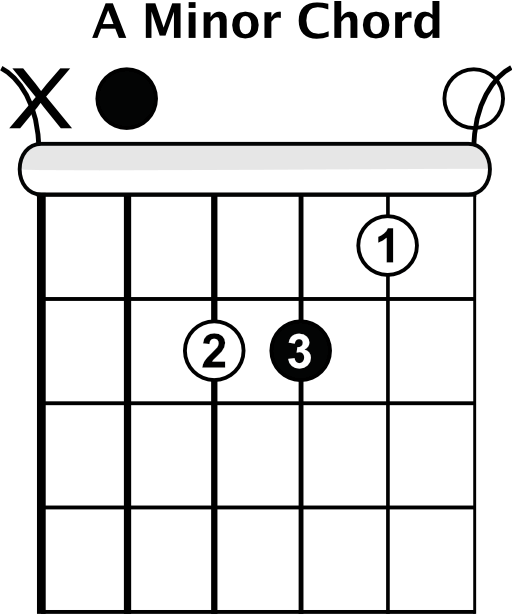
Next, we’ll learn the open A minor chord. Once again, if you know your bar chords, you know we’re taking our A major shape and just changing the fingering position slightly. Put your first finger on the first fret of the B string, your third finger on the second fret of the G string, and your second finger on the second fret of the D string. When you strum the open A minor chord, leave the low E string out. To remember the A minor chord, know that it is shaped just like the E major chord shape, but it’s moved over one string set.
The next chord we’ll look at is F major, and like I mentioned earlier, we’ll use a bar chord for this one. Use your index finger to make a bar across all six strings on the first fret, then put your second finger on the second fret of the G string, your fourth finger on the third fret of the D string, and your third finger on the third fret of the A string.
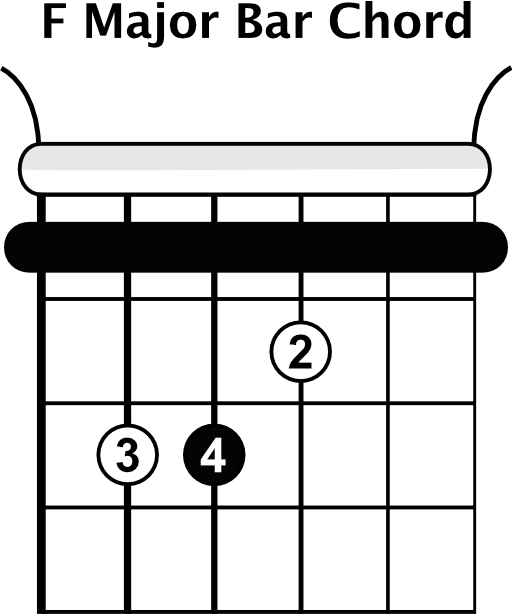
Make sure your bar is placed right behind the fret, using the bony edge of your finger rather than the soft middle part. If you want to make this F major an F minor chord, all you have to do is take your second finger off the G string.
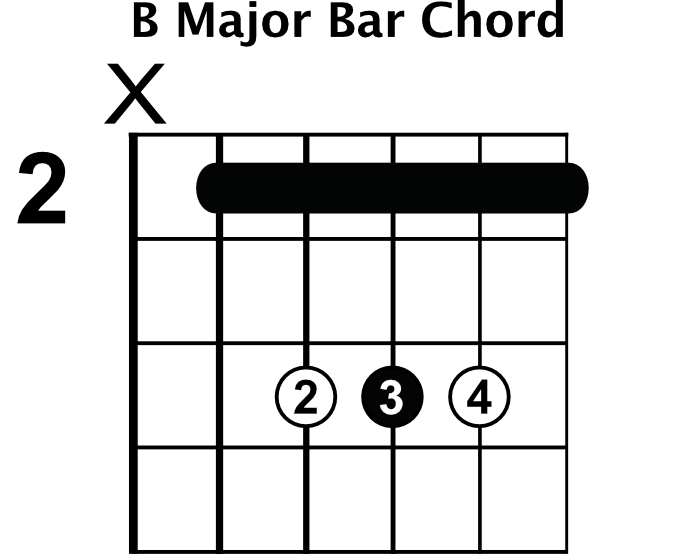
The last chord we’ll go over is B major, and this will also be a bar chord. Place your bar on the top five strings on the second fret, and put your second finger on the fourth fret of the D string, your third finger on the fourth fret of the G string, and your fourth finger on the fourth fret of the B string. If you want to turn this B major chord into a B minor chord, just switch your three fingers making the A shape into an A minor shape.
Try to relax as much as you can when playing these chords. If your guitar seems like it’s really hard to play, you may want to have your guitar set up by a professional. It’s inexpensive and it can make your guitar play as easily as possible.
Take the time to get these shapes down. Don’t expect to be fully comfortable with them overnight or even over a couple of weeks, and don’t try to tackle too many at once. Also remember not to try switching between chord shapes until you have each individual shape down, otherwise you might get frustrated.
Once you have these chords down, you can start to apply them to the common chord progressions we went over in the last lesson. Instead of playing a 1 4 5 progression with bar chords, you can try using open chords instead, like G-C-D. You can also try a 1 5 6 4 progression using open chords, which in the key of G would be G-D-E minor-C. Using open chords will give a different sound, and knowing them gives you options you can choose depending on the kind of sound you want to portray.
Now it’s time to practice these open chords to real music, so pull up your jam track for this lesson. It’s basically just the drum loop you can use to practice these chord progressions with your open chords. You can play the 1 4 5 progression, the 1 5 6 4, or you can use any of the 6 of the chords in the key of G major that you know from this lesson, G A minor B minor C D or E minor. The seventh chord in a major key is a bit of an oddball out, so don’t worry about that one for now. You can focus on the other 6 chords and try mixing them to come up with your own chord progressions.
Check out the video to see an example of how I use open chords to play the 1 4 5 and 1 5 6 4 progressions along with the jam track.
Thanks for watching this lesson, and I hope you got a lot of it. In the next lesson, we’re going to go through fundamental strumming patterns that will be the building blocks for other strumming patterns you’ll learn in the future. See you in the next video: Essential Strumming Patterns.
Next Lesson - Essential Strumming Patterns
Enter your email address below to get Ayla’s free 6 lesson plan and start playing songs on the acoustic guitar in no time!