In this beginner guitar lesson, we'll be going over three steps to playing better bar chords on the guitar. Bar chords are one of the most common areas that newer players seem to struggle with. Playing bar chords requires a lot of strength, so be prepared to spend some time building it up.
#1 Get Your Bar Strong
The first step for playing better bar chords on the guitar is to get your bar strong. This will take the most time since building up strength doesn't happen instantly. Simply incorporating bar chords into your daily practice time is a surefire way to improve your hand strength quickly.
When you're first working on getting your bar to sound right, you'll want to focus on a few important things. The first thing is horizontal finger placement. When you bring your bar down onto the strings, you'll need to be sure that you place your bar right behind the fret.
The next thing you'll need to focus on is vertical finger placement. You want your finger to make even contact with every string so that there is no buzzing or muted strings. Everyone has creases in their fingers, and you'll need to find a vertical position that works best so that the creases don't line up with the strings and cause unwanted noises.
Another important tip for making bar chords is to bring your elbow into your body. Doing this brings your hand into a more appropriate position for making a bar. You'll find this allows your to make the bar chord shape with much less effort.
Next, you'll want to make sure your wrist isn't kinked too far one way or another. Since bar chords require so much strength, it can be easy to compensate by kinking your wrist awkwardly. You'll want to avoid this by making sure your wrist is in a neutral position.
A helpful hint for cleaning up your bar is to roll your finger back a little bit so more of the side of your finger is being used. You'll notice the side of your finger is a much harder surface than the pads of your fingers. Doing this also helps stop the creases in your fingers from affecting your sound.
Lastly, you'll want to check your guitar's action to see if it needs a set-up. The distance of the strings from the fretboard can make a huge difference when you're learning bar chords and having action that's too high will result in much more difficulty playing bar chords cleanly. If you think your action is too high, you'll want to bring your guitar to a professional and have them lower it for you.
#2 Make The Shape
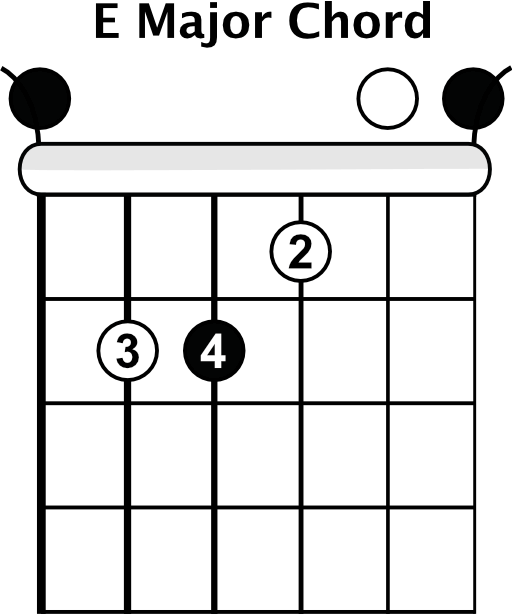
Now we'll get into making the chord shape that goes along with the bar. Oftentimes when you're playing bar chords you'll need to use alternate chord shapes because your 1st finger will be occupied making a bar. For this lesson, we'll be using the E major shape. Typically, you'll use your 1st, 2nd, and 3rd fingers to make an E major shape. However, since we'll be using our 1st finger to make the bar, we'll need to make our E major shape using our 2nd, 3rd, and 4th fingers.
#3 Shape Bar/Bar Shape
The last step for playing bar chords is combining the bar with the alternate open chord shape. Getting the bar and the shape down at the same time can be overwhelming. It's best to start by working on putting one down first, and then the other. We'll be using a G major bar chord shape for this exercise.
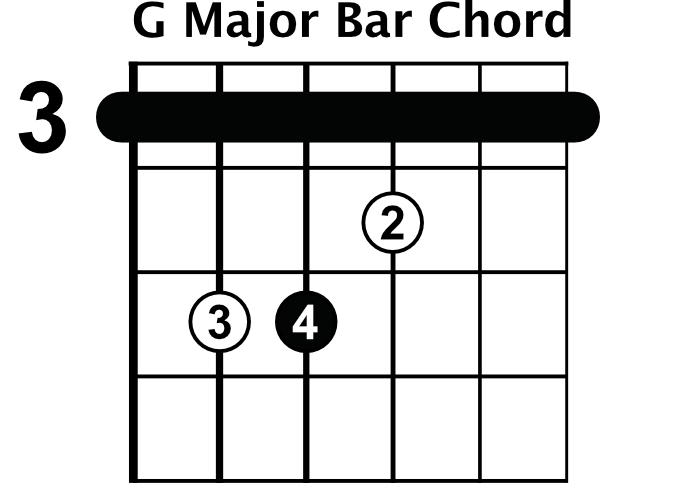
Start by placing the bar down first, and then following that with the chord shape. Do this over and over, then switch it up. Place the chord shape down first, and then follow that with the bar. Alternate back and forth between these until eventually you can place the whole bar chord shape down at once.
Apply It To Music
Once you've got the hang of bar chords, you'll want to work on applying them to some relevant music. We'd recommend looking at a CCR tune. They tend to use a few bar chords along with some simple open chords. A good one to start with is 'Have You Seen The Rain?'.

Enter your email address below to get Ayla’s free 6 lesson plan and start playing songs on the acoustic guitar in no time!