Welcome to the fourth video of the Rhythm Guitar Quick-Start Series. In this lesson we’re going to take on bar chords, which can be one of the more intimidating skills for new guitar players. Bar chords can be difficult at first since it requires a lot of strength in your index finger to make them sound clean. Don’t worry though, I’ll show you how to develop the finger strength you need and how to make the rest of the bar chord shape sound great too.
Bar chords are great because they sound distinctly different from open chords, and just like power chords, they can be played all around the fretboard. To start, let’s spend some time building strength and dexterity in your index finger so you can make the bar for the bar chords. A lot of guitar players skip over this step. This can become a source of frustration when playing if your index finger isn’t strong enough. Your finger may get fatigued at first, so just know that it can take some time to build up the strength and dexterity required to play bar chords.
The first thing you need to do is get your finger across all six strings to make your bar, but the closer you get to the nut of the guitar, the harder it will be. Instead, start at the third fret and put your finger across all six strings to make the bar.

We’re going to go over three things about bar placement to help make your bar chords sound clean. First, when you make a bar, you don’t want to come down on directly with the fleshy part of your finger. Instead, tilt your finger back just a little bit so that you’re using more of the bony edge of your finger. This will make it a bit easier to get a good sounding bar.
The second tip for bar placement is how close your finger is to the fret. If you place your finger towards the middle or back of the fret, the bar chord will end up sounding very buzzy. The closer you are to the fret, the easier it will be to get a good sounding bar.
The third tip for bar placement is very specific to each guitar player. Everyone has creases in their fingers in different spots, so you’ll need to play around with your bar and move it vertically across the strings to find the best place to put your finger. If the creases of your finger fall on a string, it will be hard to get that string to sound clean.
Now that we’ve taken a look at those bar placement tips, we’re going to talk about bar technique. What you want to do first is form a clamp with your index finger and your thumb. If your thumb is in front of or behind your finger, it’s going to be hard to get the strength you need for a good sounding bar. Basically, you want to clamp the neck of the guitar between your index and thumb.
The next thing to be aware of with bar technique is if your wrist is kinked too far in either direction. If your wrist is kinked upwards behind the guitar neck, it will be too difficult for you to get a clean sounding bar. If your wrist is kinked too far in front of the guitar neck, your wrist will get really sore and start to hurt after a while. What you want to do is start off with a neutral position, and my wrist naturally ends up being curved forwards a bit, but not too far.
This next tip will help you keep your wrist in a good position. If your elbow is up in the air far away from your body, it will be hard to get a good bar because you’re not getting a very good angle on the strings. If you pull your elbow into your body, it’s automatically going to line your finger up with the fret and put you in a better position to make your bar.
Remember all these tips as you put your bar on. Strum your bar chord and see if it sounds clean. If it doesn’t sound clean yet, readjust it and go through all the tips I’ve given you.
You’re also going to want to experiment with how much pressure you need to make your bar sound clean. You don’t want to overexert yourself by putting too much pressure on, plus that can make the strings sound sharp. Use just enough pressure to get a clean sound from your bar chord.
Let’s work on strengthening your bar now that you have some tips to work with. The best way to start is by simply making a bar on the first fret and moving it up the neck one fret at a time. Use the tips I gave you to make small adjustments if your bar chord is not sounding clean.
As you practice, if you find that your index finger is too weak to make a strong bar, you can use your middle finger to help your index make the bar. You can think of it as a stepping-stone to making clean bars. Eventually your index finger will be strong enough on its own.
You’ll want to work on this for several weeks to develop your index finger strength. It’s normal for it to take a while to build up finger strength and dexterity, but that’s normal. Consistent practice will really pay off when it comes to bar chords.
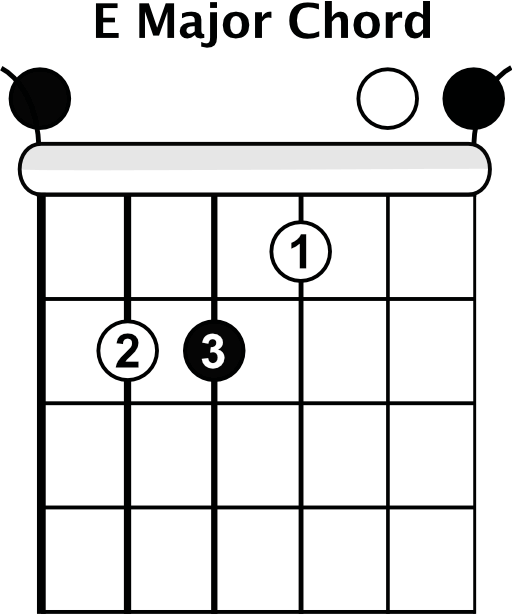
Once you’re feeling good about your finger strength, the next step in bar chords is learning how to make an open E shape with your second, third, and fourth fingers instead of your first three fingers. The open E shape will be your second finger on the first fret of the G string, your pinky on the second fret of the D string, and your third finger on the second fret of the A string. This might feel a little awkward at first, but practice this until your fingers can go right into place.
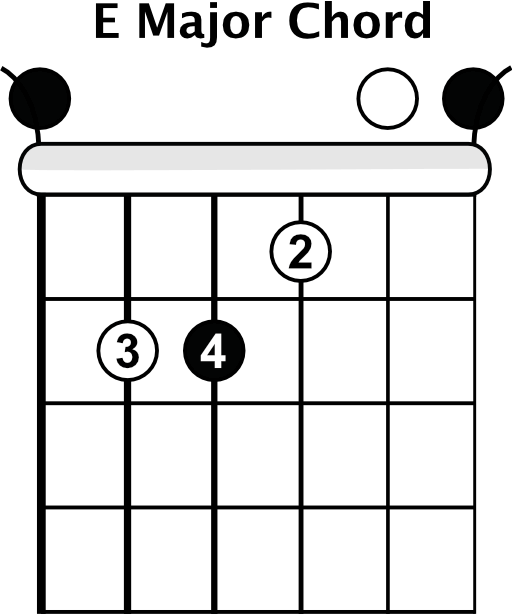
Once you can make that shape, the next part of the bar chord is to get come down on the nut of the guitar with your index finger. This is the full shape of the bar chord you’re learning. Once you’re comfortable with that, you can bring the bar chord over by placing your bar across all six strings of the third fret and making the E shape with your other fingers.
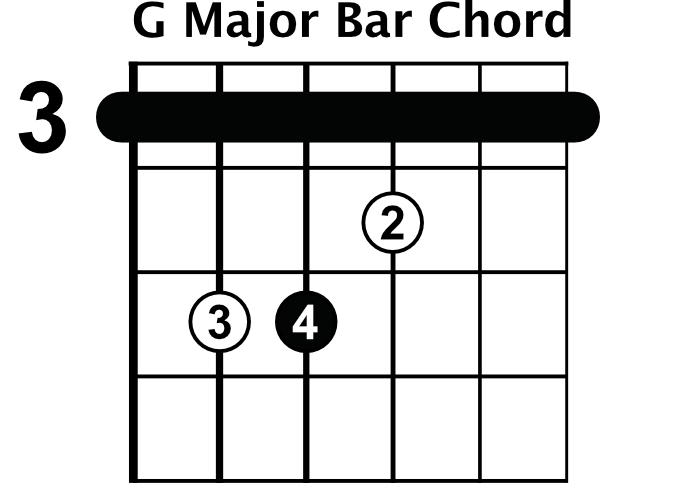
You can see that you use the movable bar as if it were the nut of the guitar. By moving the bar chord and placing your index finger across all the strings, you’re able to make that bar chord shape.
Now there’s two ways for you to work on getting this shape. You can put the bar down first and then finish with the rest of the shape, or you place the shape on first and finish with the bar. It’s a good idea to practice both initially, as it really helps get your fingers and your brain used to the shape. Eventually you’ll want to be able to place the whole shape all at once.
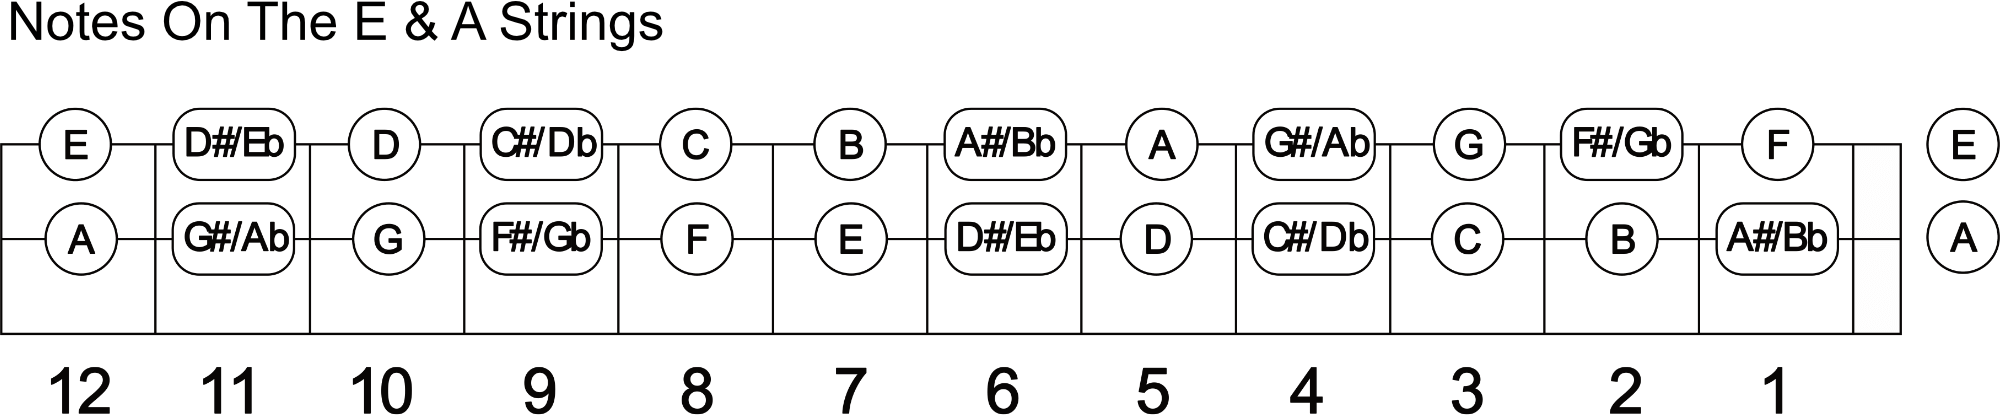
Bar chords get the their name the same way power chords do, all depending on where the shape is on the fretboard. The name comes from the lowest root note played by your index finger on the sixth string. Just like power chords, bar chords are movable. If you look at the note names on the low E string, you can move this bar chord shape anywhere on the fretboard to play any bar chord you want. You can follow along with the graphic in the video to learn the notes on the sixth string.
Experiment with this shape and move it all around because you’ll need to get used to playing bar chords all over the guitar neck. Play around with the shape and get as comfortable as you can with it.
Thanks for watching this video. I know we covered a lot of information, but you can always come back and watch it again if you need to. Work on building your finger strength and dexterity for the bar, getting the shape down, and then moving it all around the fretboard. In lesson five, we’ll take a look at major bar chord shapes.
Next Lesson - Major Bar Chord Shapes
Enter your email address below to get Ayla’s free 6 lesson plan and start playing songs on the acoustic guitar in no time!