Welcome to the sixth video of the Blues Guitar Quick-Start Series. In this lesson, we’re going to shift our focus from rhythm blues guitar over to lead blues guitar by learning a shape for the blues scale. We’re going to look at the shape and learn where the root notes are on the fretboard.
The nice thing about learning the blues scale is that once you learn it, it’s easy to make it your own and create great sounding solos. In later lessons, we’ll go over how to start choosing your notes on the blues scale, but for this lesson just learn the shape and have fun.
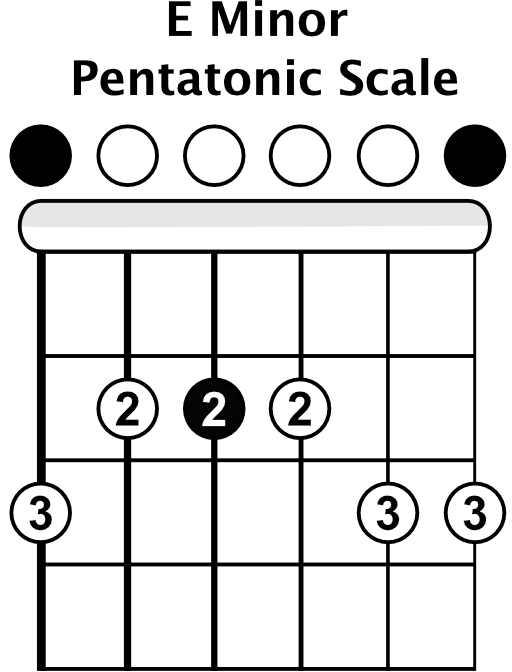
There are several different blues scale shapes, but we’re going to concentrate on only one for this lesson. It’s better to know one blues scale shape really well rather than know all the scales but not be able to use them very well. If you already know the minor pentatonic scale shape then you’re a step ahead because we only have to add one note to it, the flat 5 note. This note is responsible for giving the blues scale it’s signature “bluesy” sound.
As I mentioned, if you know your minor pentatonic scale the blues guitar scale shape will be easy because we’re only adding one note in each octave. At the beginning of the scale, start with the lowest root note on the open E string and play that note. Place your third finger on the third fret of the low E string and play that note. Get those first two notes down and memorize where they are.
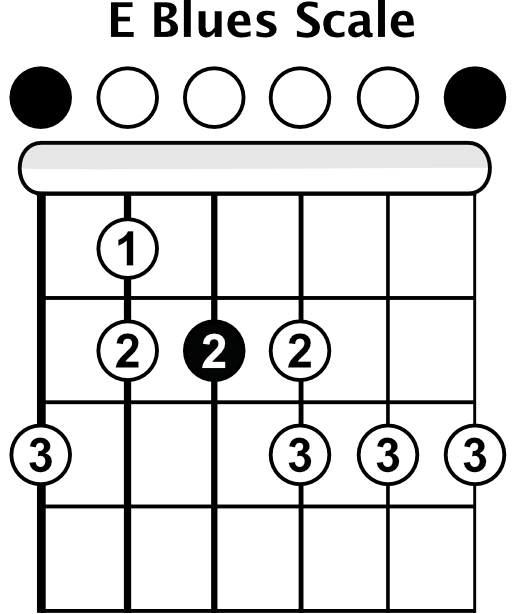
Moving to the A string, we have three notes to play here. With the minor pentatonic scale, there would normally be two notes, but this is where we will insert the flat 5 note. Play the open A string, the first fret with your first finger, and then the second fret with your second finger. Get those three notes down, and then add them to the rest of the shape.
Next is the D string and the notes here are pretty easy. Play the open D string and then the second fret with your second finger. Get comfortable with these notes, memorize them, and then add them to the rest of the scale. This now completes the first octave for the blues scale.
Now we move to the second octave, and we’ll be adding in another flat 5 note. On the G string, play the open G, the second fret with your second finger, and then the flat 5 note is the third fret with your third finger. As always, get those three notes down and then add them in to the rest of the scale.
The last two strings, the B and the high E, are really easy because the pattern is the same for both. Play the open B string and then the third fret with your third finger, followed by the same pattern on the high E string. Play the open E and then the third fret with your third finger. Get those two strings down, memorize where the notes are, and add them to the rest of the shape.
That’s the entire 6-string open E blues scale shape. When you’re looking at the diagram for this scale shape, you’ll see black, filled in circles. Those are the root notes of the scale. Your root notes are the open low E string, second fret of the D string, and the open high E string. As you practice and memorize this scale shape, be aware of the root notes. An easy way to help you learn where they are is to pause when you get to them, like I demonstrate in the video.
You can also play the same open E blues scale shape one octave higher. The only difference is that instead of playing open E string notes, your index finger will play those notes on the twelfth fret.
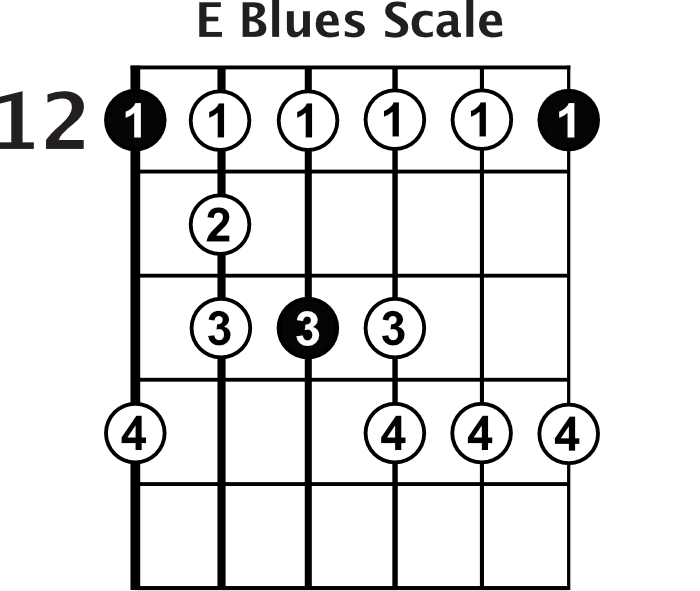
Move your scale shape up from the open low E note to the E note on the twelfth fret, which is your new starting point. Play the twelfth fret with your first finger and the fifteenth fret with your pinky. On the A string, play the twelfth fret with your first finger, thirteenth fret with your second finger, and the fourteenth fret with your third finger.
With the D string, play the twelfth fret with your first finger and the fourteenth fret with your third finger. On the G string, play the twelfth fret with your first finger, fourteenth fret with your third finger, and the fifteenth fret with your fourth finger.
Then you’ll play the B and high E strings, which are the same pattern. On the B string, play the twelfth fret with your first finger, fifteenth fret with your fourth finger, and then play the same frets on the high E string.
Now that you’ve been through it, you can see this is the same scale shape but you’re playing the open notes on the twelfth fret with your index finger. Just like before, you want to memorize where the root notes are as you play through this scale. The root notes are the twelfth fret of the low E, fourteenth fret of the D, and the twelfth fret of the high E. You can also start memorizing where the flat 5 notes are.
Once you’re comfortable with these shapes, you can pull up a jam track to work with this scale over real music. Depending on how comfortable you are with the scale, you can choose the 70 beats per minute version or the 100 beats per minute version. The jam tracks are like a dressed up metronome for this lesson, something a little more fun to practice with. In the video, you can see an example of how I would practice and develop this scale.
In the next lesson we’re going to talk about how the blues scale is actually made. It’s a great theory lesson, and even if you don’t know much about theory yet, it will be a valuable lesson for you.
Next Lesson - How The Blues Scale Is Made
Enter your email address below to get Ayla’s free 6 lesson plan and start playing songs on the acoustic guitar in no time!