Welcome to the eighth video of the Blues Guitar Quick-Start Series. In this lesson, we’re going to go over how to choose the notes you play in the blues scale, instead of playing through random blues scale shapes. Up until now, you’ve been working on getting your blues scale shape down and memorizing where the root notes are. Now I’m going to teach you how to choose notes that fit over the 1, 4, and 5 chords in the 12-bar blues progression.
We’ll start off by learning where the root notes are for the 1, 4, and 5 chords, and I’ll also show you some specific licks to play over these chords. This might be more difficult than what you’re used to playing, but the extra brainpower you’re using here will pay off big when you’re soloing.
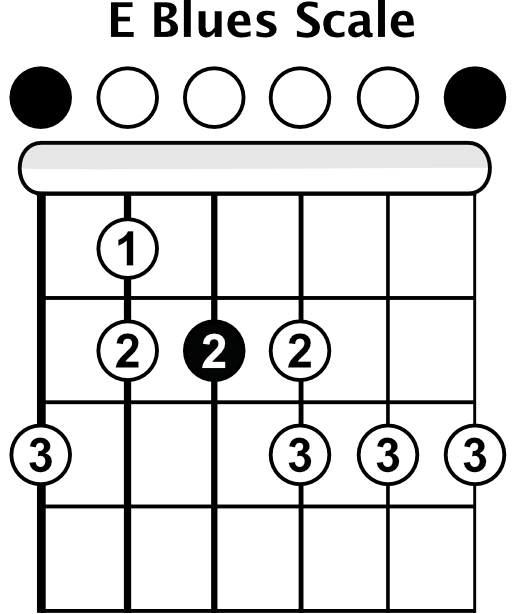
Let’s start by emphasizing the root of the 1 chord. You’ve already been doing this because by now, you should know where the root notes of the blues scale are. The root note of the 1 chord in E blues is the same as the root note of the E blues scale itself, so if you emphasize the E notes in your blues licks and solos, you’ll get the listener locked in to the sound of the 1 chord.
To show you what I mean by emphasizing the root notes of the chord, I have two custom licks to play over the 1 chord. The first one starts with your third finger on the third fret of the B string, which is the lowered seventh note of the scale. You’re going to bend that note up a whole step to an E note. Bending this note from the lowered 7th to the root note is a great way of emphasizing the root note of the 1 chord.
Your next note is the open high E string, then the third fret of the high E string. Next play the open high E string again, then a rest, and then one more open E that you’ll let ring out. You can hear how it sounds altogether in the video. As you watch me play this lick, you can hear me put more emphasis and importance on the root note of the 1 chord.
The next lick customized for our 1 chord is more of a rhythm riff, but it can be played in a solo too. We’re starting on the E note with your second finger on the second fret of the D string, playing the open D string, and then the second fret of the A string. Roll back down to the second fret of the D string, the root note, and then rest. Finish off with the low E string twice, which is another root note.
You can get a sense for the rhythm for this lick by watching my example in the video. In these licks, you can see how we started, ended, or emphasized the root notes of the 1 chord to help them fit over that chord better.
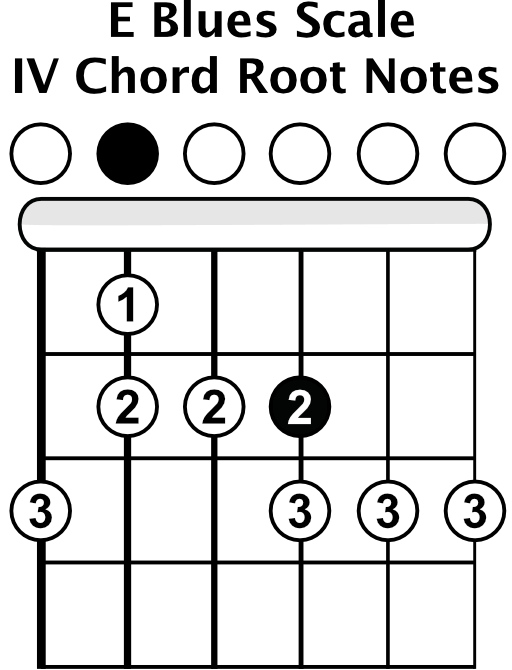
When the 4 chord comes around in the 12-bar blues progression, you can do the same thing by emphasizing the root notes of the 4 chord. The 4 chord in this case is an A chord, so your root notes are the open A string and the second fret of the G string. Make sure you memorize those note locations.
The first lick we have for the 4 chord starts off on a root note. Place your second finger on the second fret of the G string, play the open G, then move down to the second fret of the D string. Head back to the open G, the second fret of the G string, rest, and then end with the open A string.
The second lick we have for the 4 chord starts on the root note again. Place your second finger on the second fret of the G string and play it twice with two swung eighth notes. Play the open high E string, and then back to the second fret of the G string. Next, play the third fret of the high E followed by the open E. Finish by playing the open G string, and then end on the second fret of the G string, letting that root note ring out.
Going through these licks gives you a lot to think about, but start out by remembering where your root notes are. Once you’ve got those down, you can move on from there.
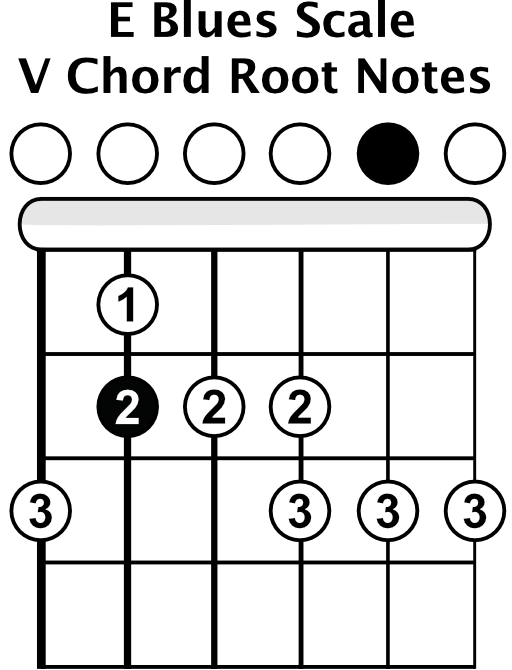
Now we’ll take a look at the root notes for the 5 chord and learn a couple of licks for this chord. The five chord in the key of E blues is a B chord, and we’ve got a B note on the second fret of the A string, plus the open B string. Again, memorize where those root notes are so you can emphasize them when playing over the 5 chord.
The first lick starts with the second fret of the G string, and we’re going to bend it up a whole step to a B note. The next two notes are the open B string and the third fret of the B string. Then you’ll play the open B string, the second fret of the G string, and finish off with the open B string. Take a look in the video to get a feel for the rhythm of this lick.
The next lick meant for the 5 chord is basically just going down through the minor pentatonic scale. Start with the highest note, which is the third fret of the high E string, and then play the open E. Next, play the third fret of the B string, followed by the open B. Move to the second fret of the G string, play the open G string, and finish the lick off on the open B, which of course is the root note.
The rhythm for this lick is a bit different because the first two notes are actually triplets, so the lick moves a bit faster. Take a look at the playing in the video.
Now that you get the idea of emphasizing root notes of the chords when you’re playing lead guitar, you can pull up the jam tracks and try to put this into practice. If it’s feeling like a bit too much to start, just try playing the root note of each chord as the jam track plays.
Don’t get too bogged down in the theory of this, because the blues is all about feelings, emotions, and guts. It’s about letting whatever wants to come out of you come out. If you have some theory knowledge, your brain will be able to help your heart figure out what to play.
In the video, I play an example of just hitting the root notes for each chord in the jam track. Once you can do that and are familiar with the root notes, try making up solos that emphasize the root notes and using the licks you’ve learned here. You can check out my example in the video of what new licks can sound like.
I know this is a lot of information to take in, but if you apply everything you’ve learned to your playing, you’ll be ahead of a lot of guitar players. Being able to choose your notes instead of playing licks at random makes a big difference in your sound. When it comes to playing the blues, you want to let your heart and gut guide you, but knowing what’s going on behind the chords and scales is great.
In the next lesson, we’re going to look at how to move your self-expression up another level in blues guitar playing. We’ll talk about phrasing, sliding, bending, and vibrato so you can incorporate these elements into your playing.
Next Lesson - Blues Phrasing & Expression
Enter your email address below to get Ayla’s free 6 lesson plan and start playing songs on the acoustic guitar in no time!